These days, it’s pretty easy to burn through the 15GB of free storage that comes with your Gmail account. If you forget to delete those promotional messages from businesses you no longer shop with, or lose track of all the newsletters you’ve subscribed to over the years, it won’t be long before you end up with thousands of unread emails.
Maybe you’ve been meaning to clear out your Gmail inbox, but the thought of sifting through countless old messages seems daunting. Fortunately, there’s an easy way to free up storage space on your Google Account while keeping all your old emails.
All you need to do is create a second Gmail account to store all your current messages. There’s no limit to the number of free Google Accounts you can have, which means you can set one up as a dedicated backup account, then transfer all your old emails to it.
Transferring your Gmail messages is also a great strategy if you have a school or business Gmail account that you won’t have constant access to. Most universities and businesses will deactivate your account once you’re no longer a student or employee, so if you want to see your old messages and files, you’ll need to transfer them to a personal account before you lose access.
It doesn’t take long to complete the entire process of transferring your Gmail messages to a new account too long, but it will depend on how many messages you have. We’ll walk you through the simple process of transferring your emails from your old account to your new one (including the important step of backing everything up first).
For more information about Gmail, learn about the new AI summaries or how to use emoji reactions.
How much data can you store in Gmail?
15GB of free storage might sound like a lot when you sign up for a Gmail account, but it fills up quickly. For starters, 15GB isn’t just used for email: it also includes the files you’ve saved to your Google Drive and Google Photos.
If you often send or receive messages that contain large files such as videos, or if you find yourself uploading a lot of photos and videos to Google Photos, then it won’t be long before you see an “Account storage is full” notification. This means you’ll no longer be able to send or receive email on that account, so you’ll want to do something about it as soon as possible.
The fastest solution is to upgrade to a Google One account. But even if you choose the cheapest plan – 100GB for $20/year – you’ll still be paying money to store old emails you may not even need anymore.
If you don’t want to buy more storage, you can always delete your old emails. You can reclaim a surprising amount of storage space by moving large files to the Recycle Bin. Gmail makes it easy for you to identify and delete files by size. However, this option may seem tedious; maybe you don’t want to spend hours sifting through correspondence from a decade or more ago, deciding which memories to keep and which to get rid of forever.
There’s always the option to download large files to your desktop before deleting them from your Google account; but at some point you will probably face the same problem with your local files and need to manage the storage space on your device.
Which brings us to our “core option”: Transferring all your emails to a new Gmail account.
How to transfer your Gmail messages to a new email account
Before starting the Gmail transfer process, we recommend that you back up your emails. You can do this by downloading your emails either to your computer or to an external hard drive. You can delete the backup once you’re done transferring your emails to your new account if you like, but it’s always a good idea to have an extra copy stored locally.
To backup your Gmail messages, go to Google Takeout. Using our test Gmail account, which contains about 75,000 messages, we received a download from Google Takeout in about 2 hours.
Once you’ve backed up your emails, you’re ready to start transferring them. Here are the steps you need to take:
-
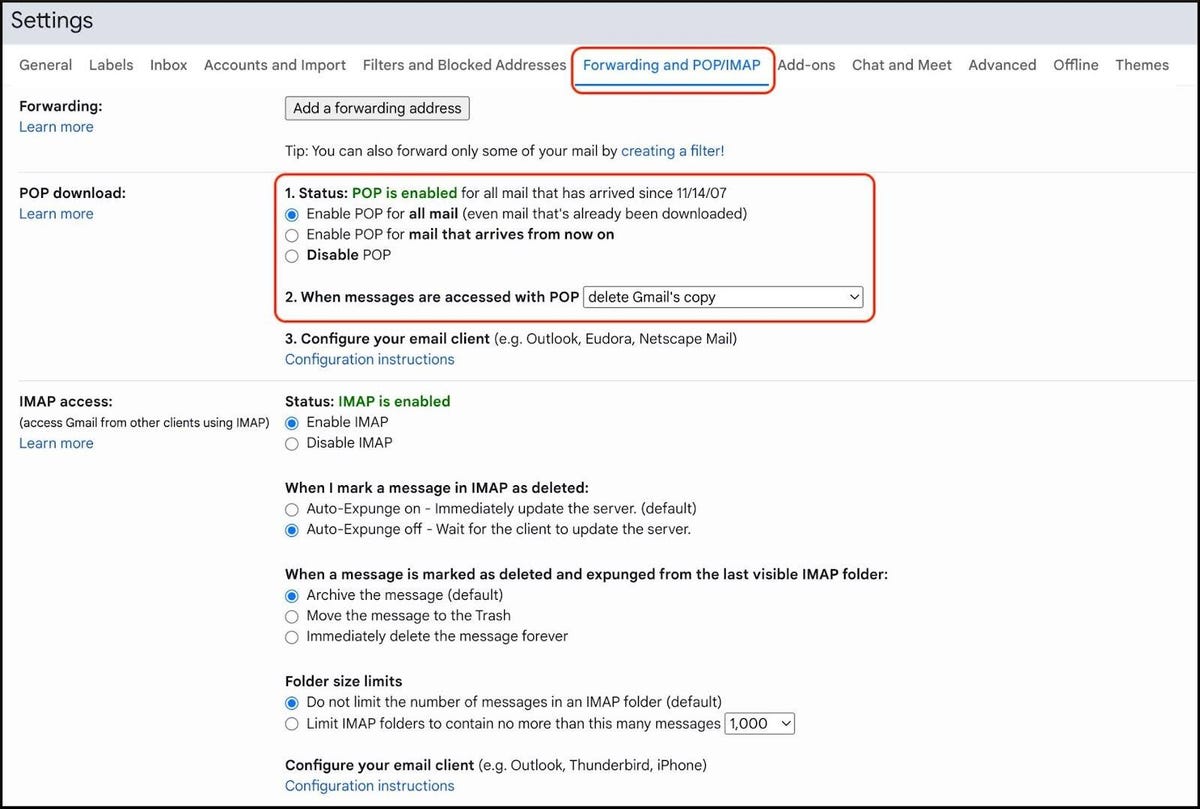
Start by logging into your original Gmail account, click the gear icon in the top right, and click See all settings.
-
Choose POP/IMAP forwarding and then select the option Enable POP for all mail (POP stands for Post Office Protocol).
-
You will have several options below When messages are accessed with POP. To automatically delete emails from your original account after the transfer, select delete the Gmail copy.
-
Choose Save the changes.
Now it’s time to create your new account and transfer all your messages there:
-
If you haven’t already, create your brand new Gmail account with zero mail – we’ll call it your backup account.
-
Log in to your new backup account, click the gear icon at the top and select See all settings.
-
Choose Accounts and Imports tab at the top and then select Add an email account to Check mail from other accounts.
-
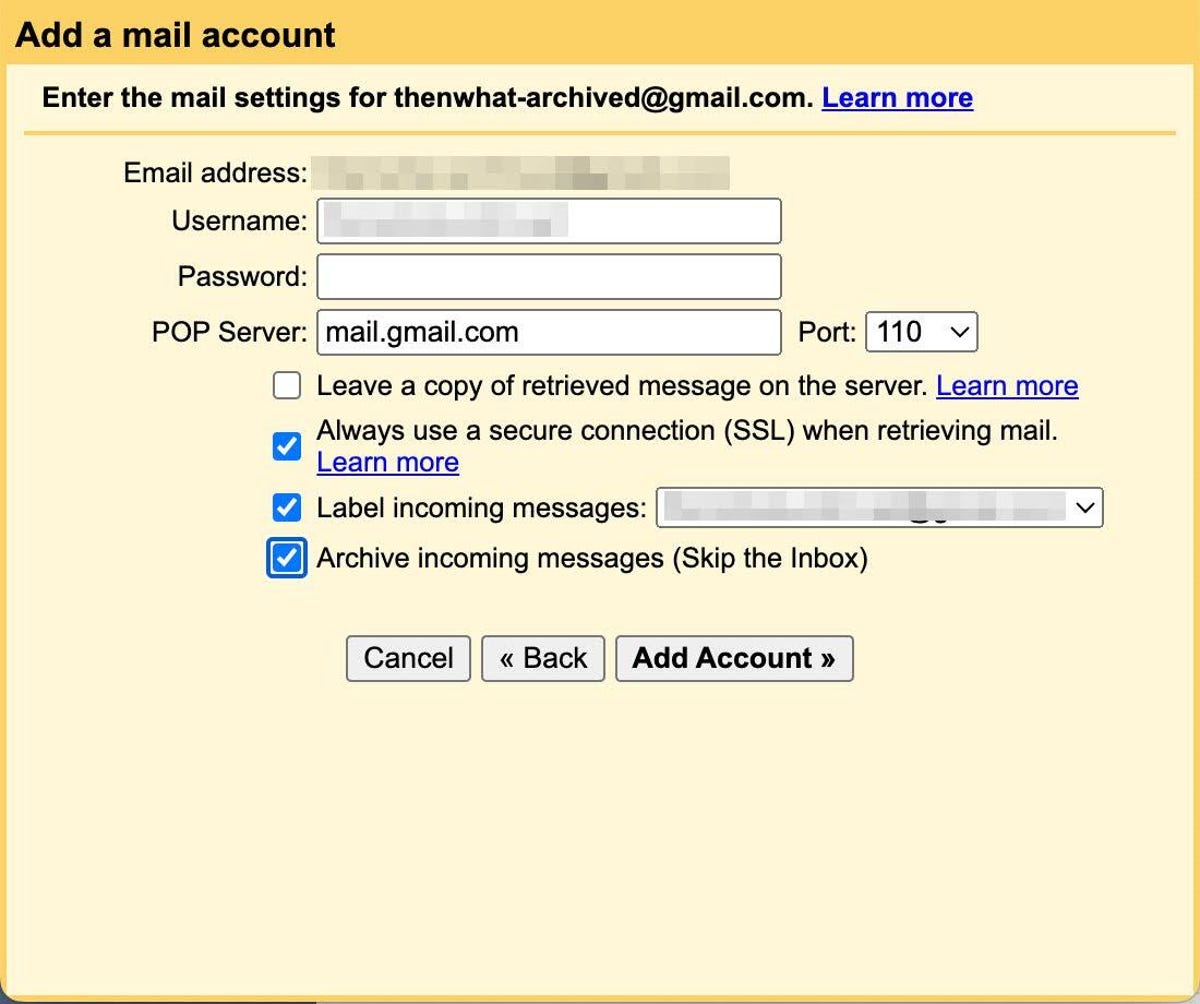
In the pop-up window, enter the name of your original Gmail account. Choose The next one.
-
Choose Import emails from my other account (POP3)andchoose The next one again.
-
Enter the password of your original Gmail account. You may also need to create a Google App password (see note below).
-
Choose 995 under Port.
-
Check these 3 boxes: Always use a secure connection (SSL) when retrieving mail, Mark incoming messages, Archive incoming messages (skip inbox)
-
Choose Add profile.
You’ll likely need to create a Google app password to transfer messages to Gmail
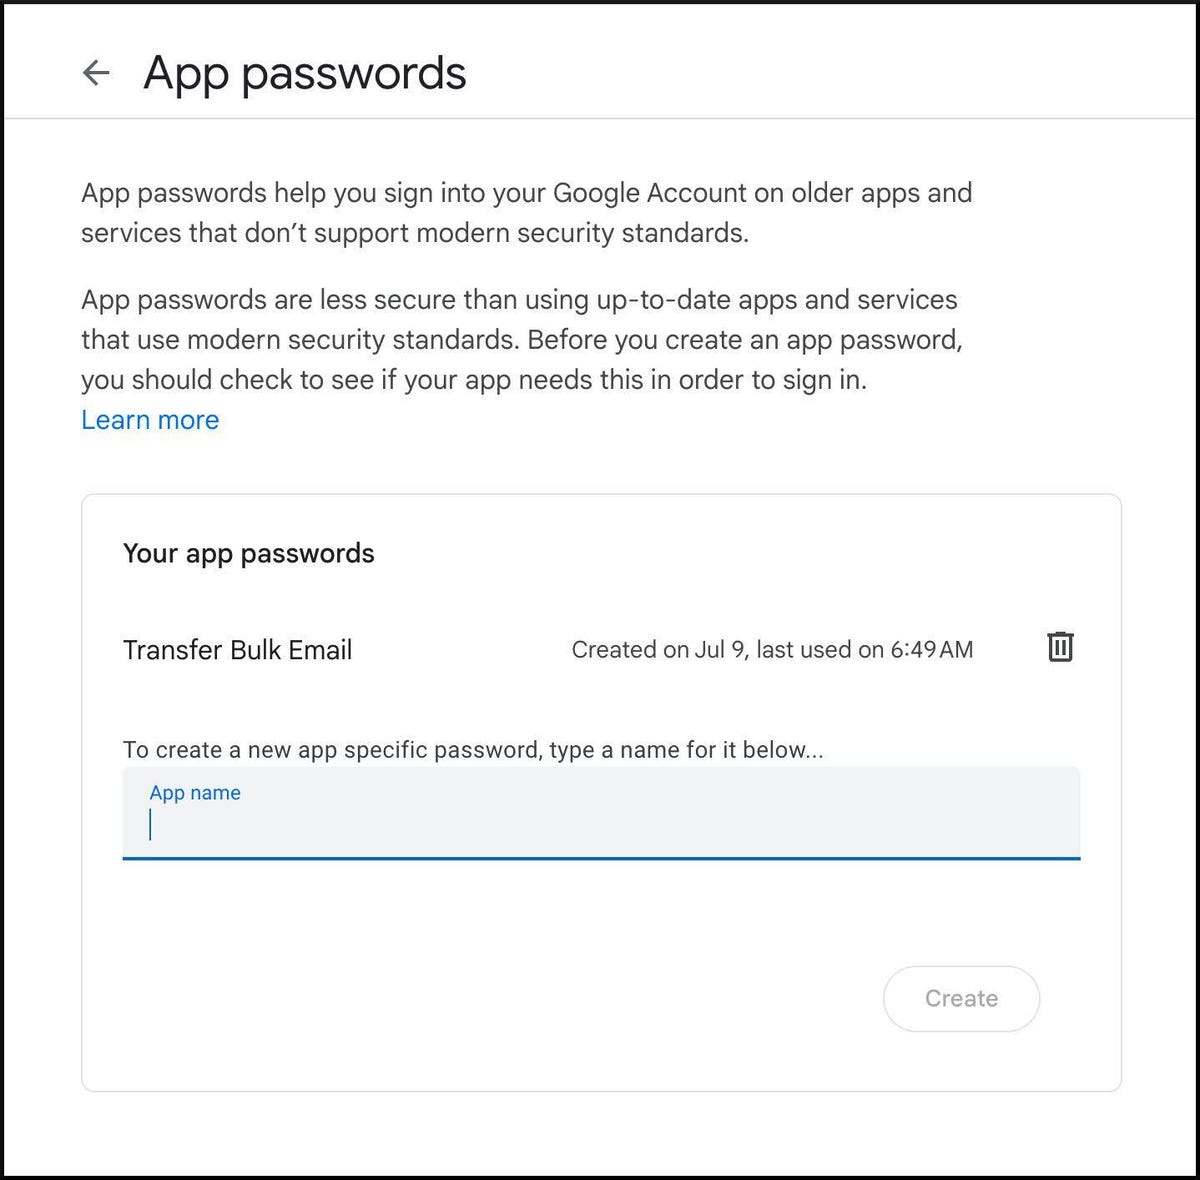
We tested this Gmail message transfer process twice, and both times the default password for Gmail accounts didn’t work. After a little research, we found that we would need to create a temporary “app password” to sync the accounts.
Google app passwords are 16-digit passwords created for “less secure” apps or devices to access your Google Account. They work just like your Google password.
If your regular Google password doesn’t work for syncing Gmail accounts, visit https://myaccount.google.com/apppasswords to create an app password. Just create a name for the password—we used “Bulky Email Transfer”—and then hit the Create button. You will get a pop-up window with your new 16-digit password.
Once you’ve created the app password, go back to step 6 of the instructions above and use this new app password instead of your regular password.
Important: Google will only show your app password once. Once you’ve created it, you can’t request to see it again, so be sure to save or otherwise save it after it’s created.
Google’s own Help Center mentions that “app passwords are not recommended and in most cases unnecessary.” So, once you’re done transferring your Gmail messages, we recommend deleting your app password.
What happens after my Gmail accounts sync?
Once you’ve successfully linked your new backup Gmail account to your original account, your emails should start transferring automatically. The process can take several hours or days, depending on how many emails you have.
In our test account with about 75,000 messages, we found that it took Gmail about 2 full days to transfer all of them from the original account to the new archived email account.
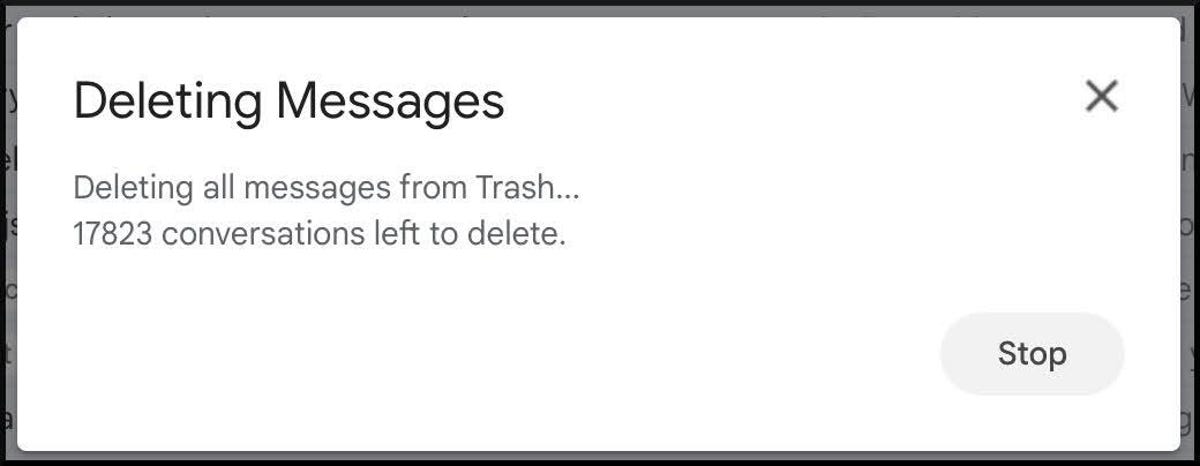
important: After you transfer your Gmail messages to your backup email account, your original Gmail account will put all those messages in the Trash folder, which you will have to empty manually. It took about an hour to clear those 75,000 messages from the trash.
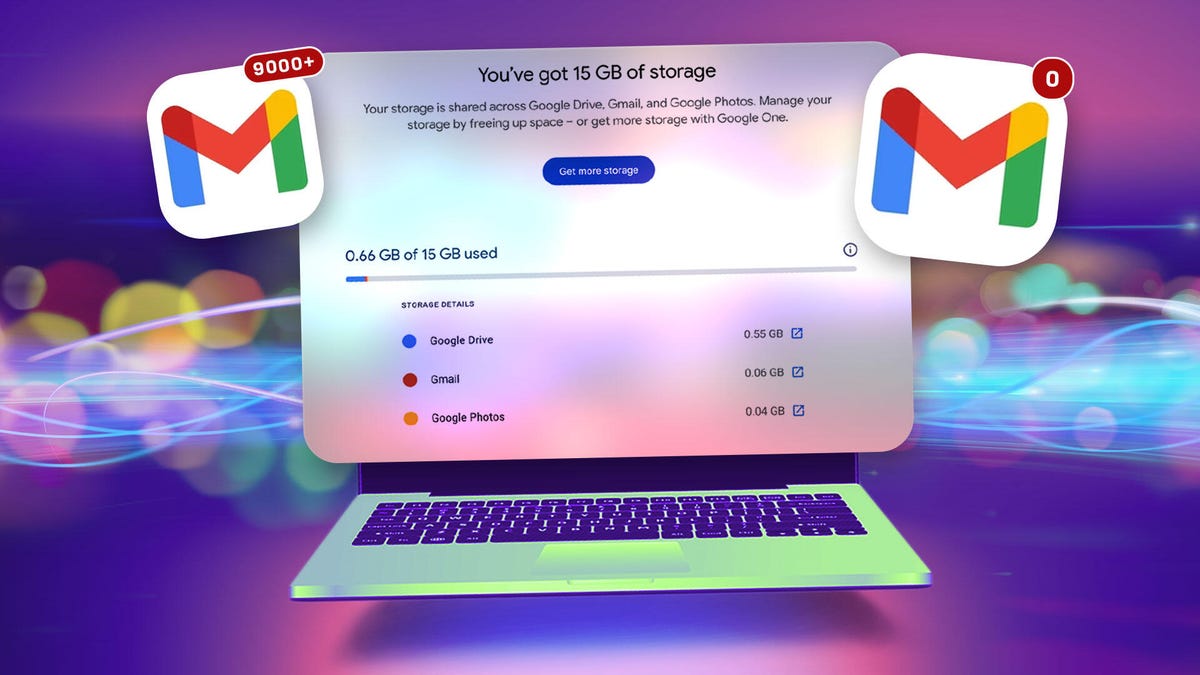
Before transferring messages to Gmail, our test account used just over 12GB, or 80%, of Google’s free 15GB. After the transfer, the account was only using 0.66 GB, of which 0.06 GB was from Gmail.
Which Gmail messages won’t be transferred?
We found that Gmail transferred all of our messages except for two categories – Drafts and Spam.
You’ll have to decide what to do with your drafts manually. Spam messages are automatically deleted every 30 days, so you can either let Gmail handle it or go to the spam folder yourself after transferring your mail and delete or forward those messages.
Once all your emails are imported into your new account, enjoy the inbox zero experience. You have given new life to your original account.
At this point, there are two final steps: you’ll want to stop the automatic transfer process so you can continue using your original account, and you’ll want to delete that app password if you need to.
-
Sign in to your new account, sign in to your Settings and select See all settings.
-
Choose Accounts and Imports and then select Delete for your original account (sub Check mail from other accounts.)
-
When prompted to Confirm email account deletionchoose Okay.
If you had to create a Google app password and want to delete it now, go back to https://myaccount.google.com/apppasswords and click the trash icon next to the password you created.
Congratulations, you’re done!
One final important note: Google will delete accounts that have been inactive for more than two years. So make sure you don’t completely ignore all your old emails after transferring them. If you don’t plan to use your archived email account regularly, you can still keep the account active by logging in at least once every two years.